Perhaps your school or department has a Cricut (or Silhouette) cutting machine, or maybe you own one of your own. They're great for making labels, signage, wall decals, or heat press t-shirt designs... but have you thought about how you might use this tool with an entire classroom of students? I've done it, and I'm going to share my workflow with you so that you can do it, too.
To start with, I do NOT have students create accounts in or use the Cricut Design Space software. Due to IL SOPPA law concerns, I find it easier to just avoid having students create accounts anywhere it isn't absolutely necessary.
Instead, I have students design their projects using the free Google Workspace tools that we already know and love! My favorite way to do this is to create a template for students in Google Slides. I set the slides to whatever size we need for our final designs to be (File --> Page Setup --> Custom), and - did you know - you can even set the background of your slide to be transparent (Background --> Color --> Transparent)?!
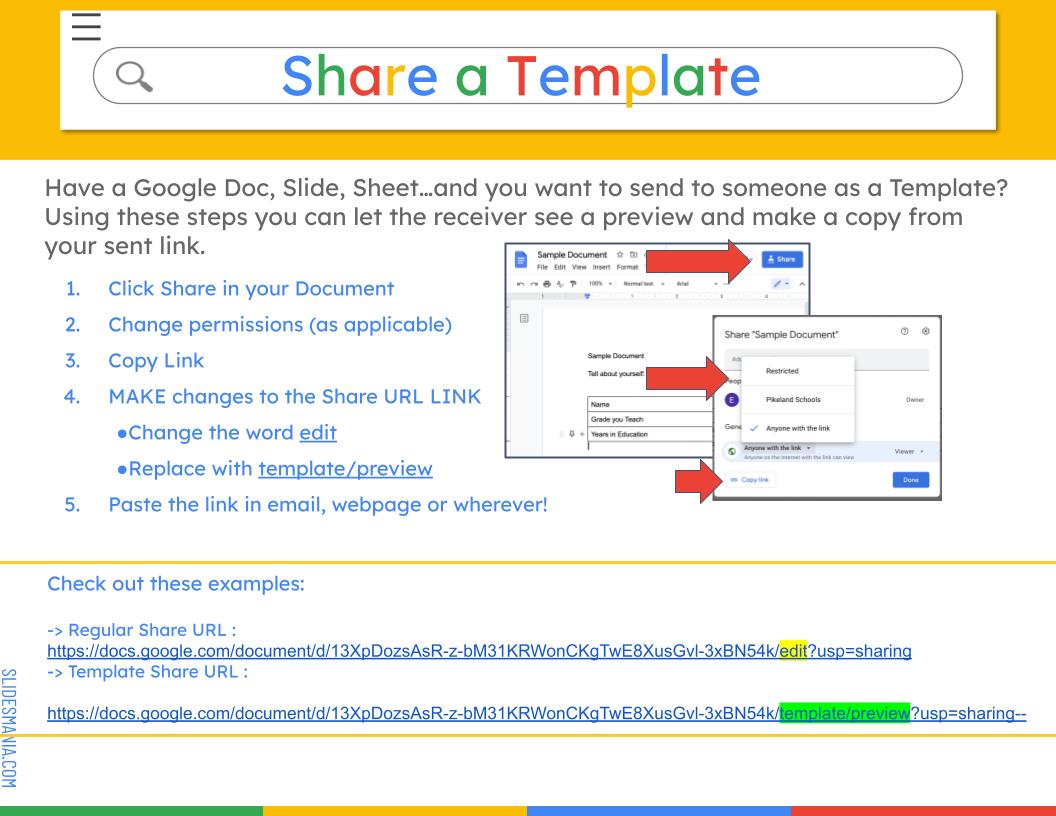
Once you have a slide set up for students to work on, you can share a modified URL with them - by just changing the URL in a Google Doc/Slide/Sheet...you can share as a preview & template! Here are the details, courtesy of my friend and colleague Emily Pool (@EPool01 on Twitter).
What will you have your students design? In the past, we've made decals with our names to put on our Chromebooks, personal crest designs, and daily affirmations (heat-pressed onto zipper pouches). Every time I complete a project, I think of a whole bunch more I'd like to do after that!
Here's an example of a template that I used with students as a starter project: a simple name design decal utilizing word art + a symbol, shape, or graphic to represent each student's personality. (Please note: the first slide is blank because this is where students will create their own designs.) - Feel free to make a copy of this template and/or customize it for your own use!
Once a student creates their design in Google Slides, they will need to save their slide as a .jpg or .png file, and submit it to the teacher (Canvas, Google Classroom, a shared Drive folder, email, etc...) This can be done from within Google Slides by going to File --> Download --> PNG Image (or JPEG image) - I prefer the PNG image file format because it retains a transparent background and makes my job easier in the next step!
NOW, you as the teacher/facilitator will need to import these designs into Cricut Design Space and cut them out. That means you'll need to download the Cricut Design Space software and create a free account for yourself.
I made a short video that explains how I import .jpg and .png files into Cricut Design Space and get them ready to cut:
I like to cut out student projects during class, preferably while they're working on another activity at their seats so that I can work with them in small groups of 2-3. They can watch the machine cut out their design, and then I have students weed their own design to remove all of the material in the negative space. I like to tell them to start with the background of the decal first. Remove all of the background, and then it should be more clear to them what other pieces (if any) need to be removed.
I also allow students to apply their own decals using transfer tape. I generally do one demo of how this is done, and then they go off on their own! Sometimes working with a partner can be helpful here. It just depends on the size of your class.
Our Chromebook name labels turned out pretty cute, actually, and they're super functional:
You could have students create .jpg images using any graphic design tool that you have access to at your school, such as Adobe Express or Canva, too. I like using Google tools because the skills they learn are transferrable to other projects/slide presentations using Google in the future.
I also love that this workflow only requires ONE Cricut cutting machine at a time. If you have access to additional machines, it would make the cutting step move more quickly, but you would probably need another adult with a Design Space account to connect to the other machine and cut along side you.
Lastly, the vinyl we used for these Chromebook decals are made of REMOVABLE matte vinyl, which received the "blessing" of the tech department prior to our project's inception! So you might want to get that cleared as well if you're doing the Chromebook sticker thing.
Have you used Cricut in the classroom to do a project with students? Please share with me, or tag me in your projects on Twitter, @MrsLeban!
- Jen


No comments :
Post a Comment